Universal Email Integration Guide
Universal Email allows you to automatically convert your email links into multi-platform deep links that take users directly to content in the app on mobile devices, while still maintaining the same web experience for desktop and mobile users without the app.
This guide applies to all Branch Universal Email partners. Please follow the steps below to integrate your ESP with Branch. If your ESP requires additional instructions, you will be directed to a dedicated guide.
1. Complete Universal Email Prerequisites
DEVELOPER MAY BE REQUIRED
The following Universal Email prerequisite includes providing URI schemes and other components that may require a developer:
DEVELOPER REQUIRED
The following Universal Email prerequisites involve app code changes:
2. Enable the Integration
To enable the integration:
- In the left-hand navigation, click Email.
- On the Email overview page, click the Manager tab at the top.
- Find your ESP and click Enable.
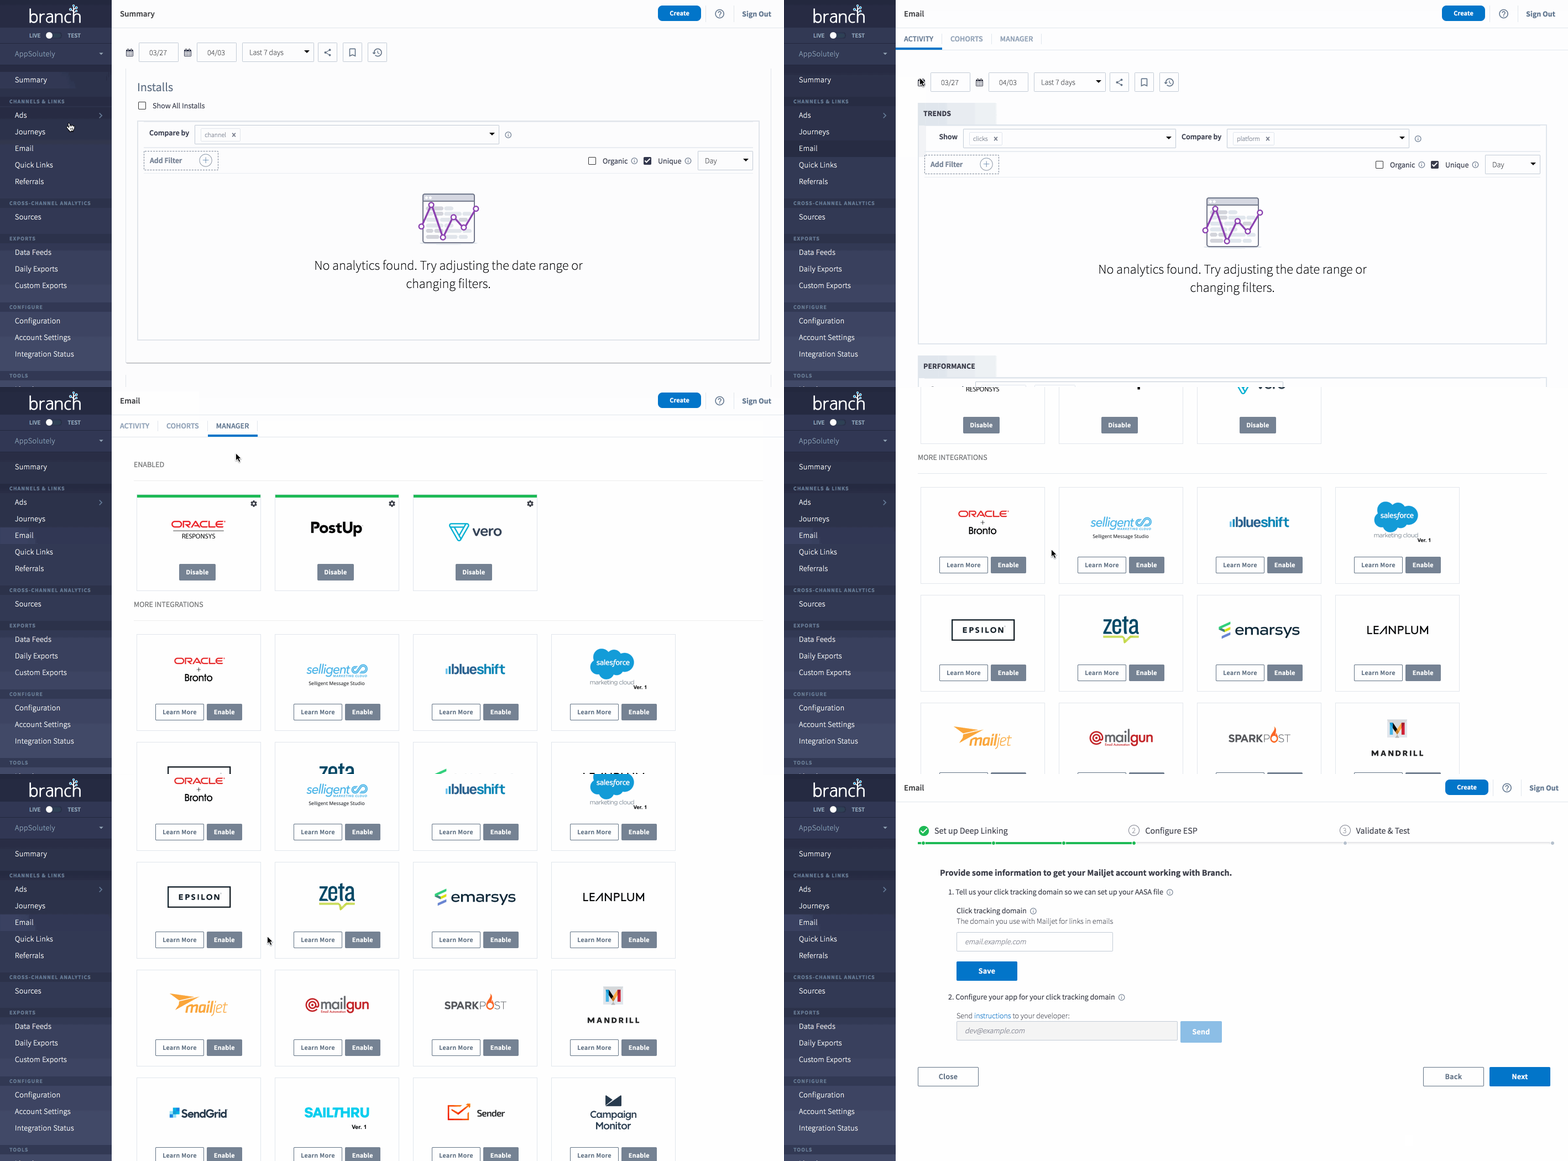
Branch automatically detects any global link settings you have already provided during the initial setup of your Branch account as outlined above.
If you have not set up your global link settings and redirect preferences, you will be prompted to do so at this time.
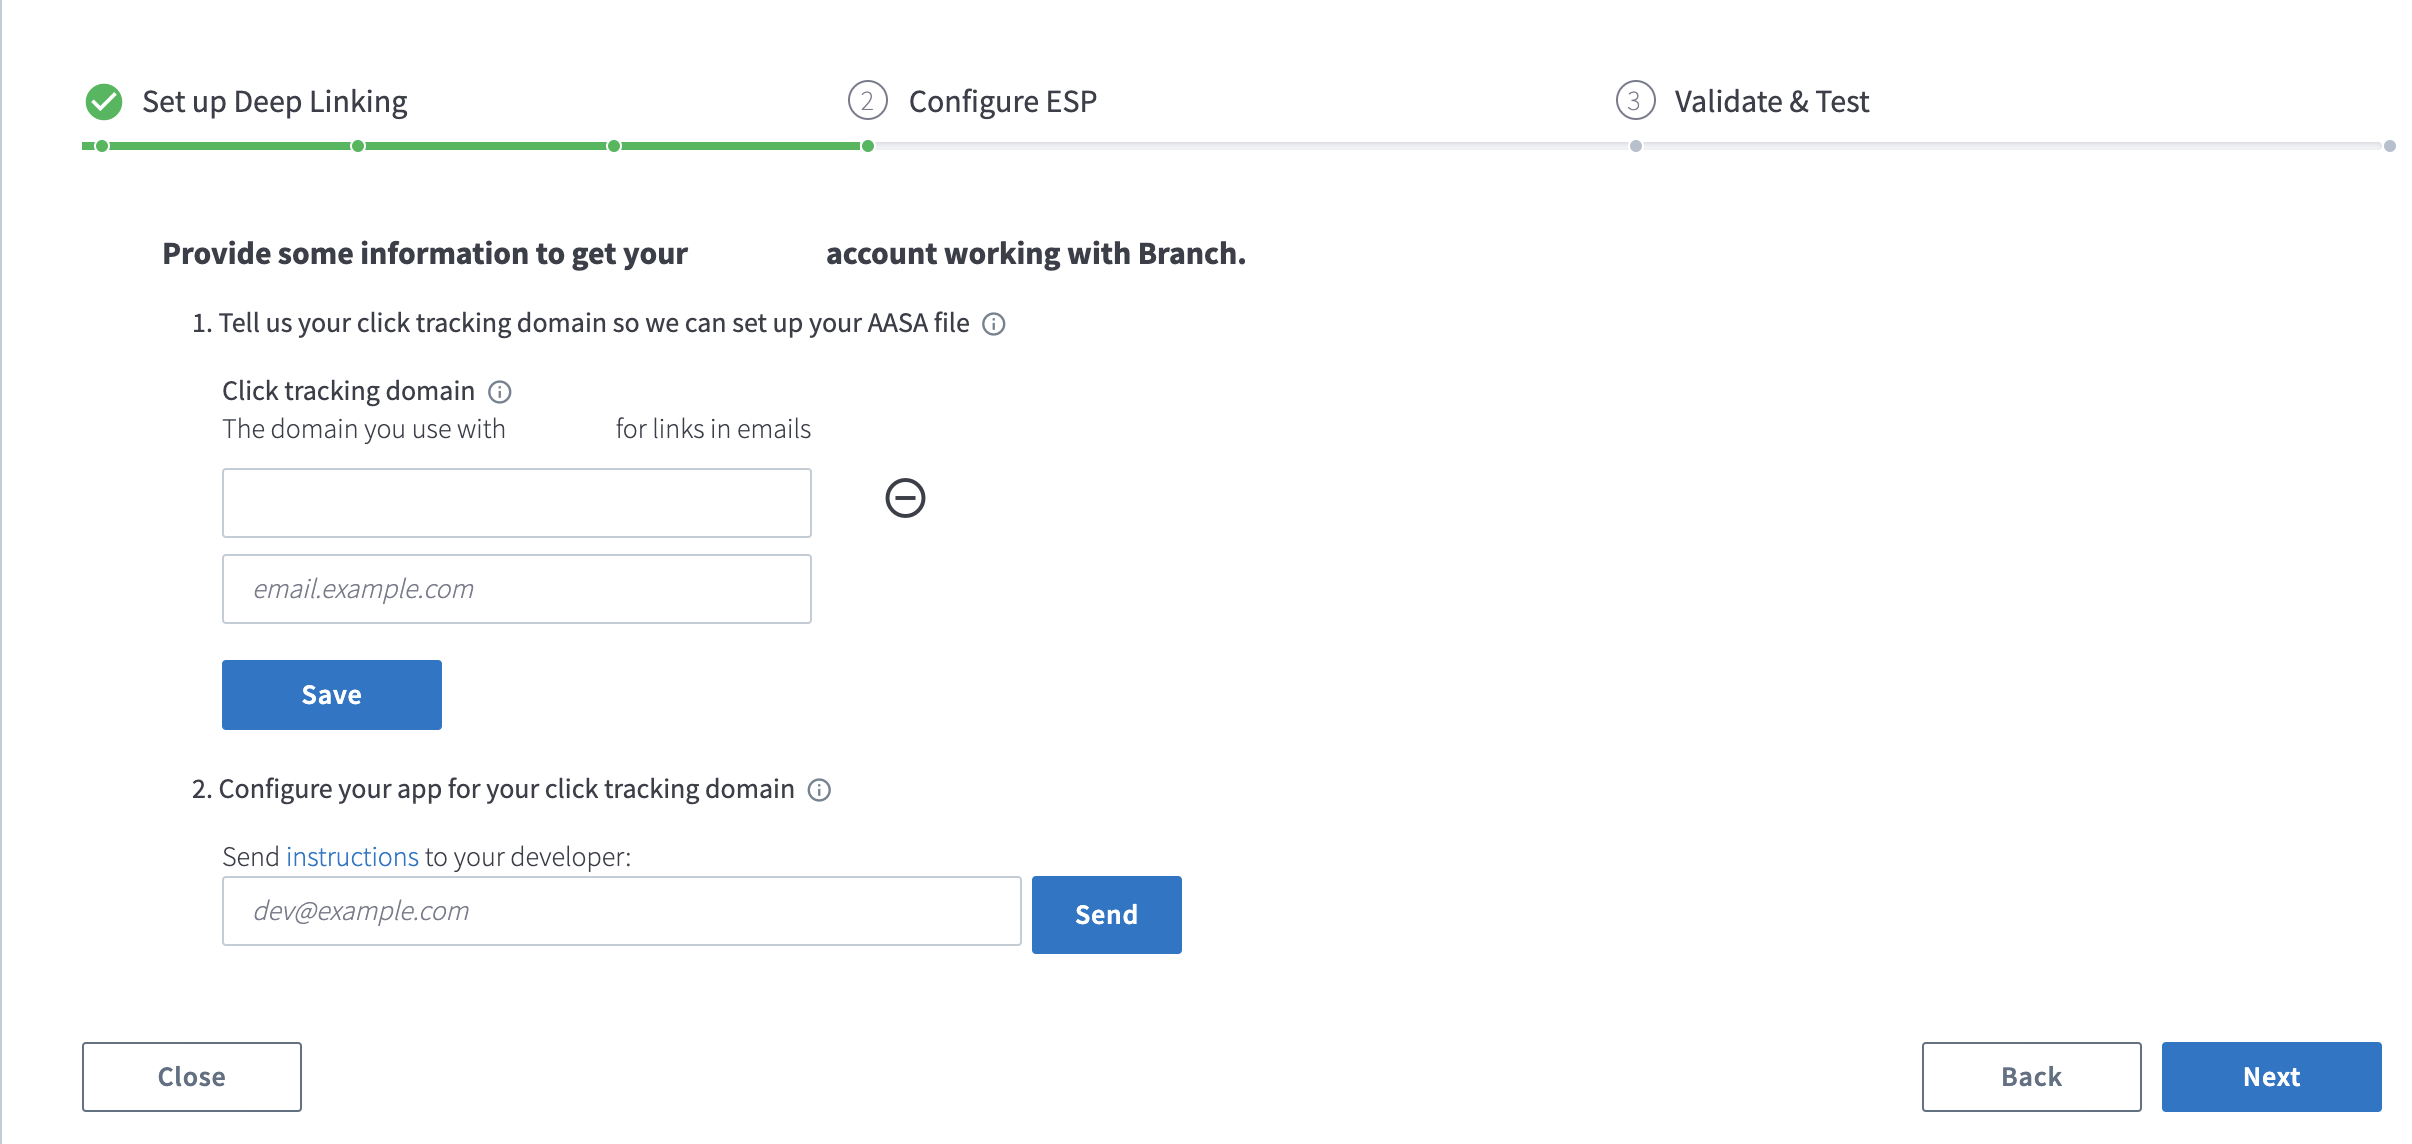
3. Provide Click Tracking Domain
Click tracking domains allow you to track engagement on email opens and link clicks.
If you're unsure what your click tracking domain (CTD) is, take a look at one of your recently sent emails. If you hover over the link or right-click/copy the link address, you will see that the domain of the link in the email does not match the URL in your HTML. This domain is your click tracking domain used by your ESP to provide you click reporting.
Alternatively, use the button below to find your ESP's documentation on how to find your click tracking domain. If no documentation is available, we provide a link on how to contact the support team for your ESP.
Remove
http://orhttps://when adding your click tracking domain in the Branch dashboard
KEEP IN MIND
-
You can enable the integration with multiple CTD if needed, but you cannot add the same CTD to multiple Branch dashboards or ESP integrations.
-
In some ESP integrations, you will also be required to add a "data domain" the ESP uses to collect click data.
- The ESP selected will dictate whether this field appears or not - if the field does not appear, you're not required to add it.
- Confirm the data domain with your ESP’s account manager.
-
In some ESP integrations, you will also be required to send them the AASA file Branch generates by providing your ESP's contact email.
- The ESP selected will dictate whether this field appears or not - if the field does not appear, you're not required to add it.
Before you click NEXT and proceed to the Validate & Test section, please complete the following section as it’s required for passing integration validation.
4. Point DNS CNAME to Branch
The majority of ESP integrations require updating the DNS record for your CTD to include a CNAME (alias) record that points to Branch’s thirdparty.bnc.lt domain.
Please follow your web hosting provider’s instructions on how to configure your DNS CNAME. Here are a few common provider’s instructions for reference:
Important CNAME Info
- The Branch dashboard must be enabled & reflect the CTD AFTER you add the CNAME.
- If the CTD already has SSL setup, confirm if your security credentials allow a 3rd party to submit a CSR on behalf of the domain. If not, contact Branch's Support team, to coordinate providing an SSL certificate manually to Branch.
- Once the CNAME is added, Branch auto-generates an SSL certificate and AASA file for your click tracking domain. It may take up to an hour to resolve SSL errors once you change the CNAME. During this time, link redirects on the click tracking domain will redirect to the Default URL you provided in the General Configuration section of your account.
- If you are making this change to a live domain with active email click traffic, schedule the CNAME change to occur during an off-hours time with low click traffic.
5. Validate the Integration
Once the SSL certificates and AASA file (iOS only) have been generated, you can proceed to reviewing the validation tests, fix any issues and then test the integration.
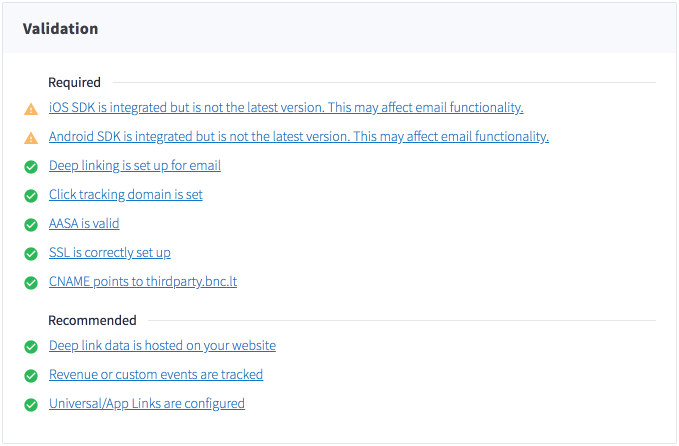
Branch automatically validates the following:
- iOS SDK is integrated (required)
- Android SDK is integrated (required)
- Deep linking is setup (required)
- Click Tracking Domain is setup (required)
- AASA file is valid (required) - Use our AASA File Validator: https://branch.io/resources/aasa-validator/
- SSL is correctly setup (required)
- CNAME points to thirdparty.bnc.lt (case-by-case requirement)
- Universal Linking is setup (required)
- Hosted deep link data (optional)
- App Events being tracked (optional)
- Android App Links (optional)
Common Validation Issues
CNAME Does Not Point to Branch
Pointing your DNS CNAME to Branch is a vital step of the integration process. Unfortunately, it’s also the step that causes the most headaches.
Please make sure to do the following:
- Log into your DNS provider’s console and add the CNAME record as described here.
- Wait at least 60 minutes after you’ve added the CNAME record so that it has time to propagate and Branch can create the resulting SSL certificates and AASA files (for iOS apps only).
SSL Not Correctly Set Up
If you are having issues with the SSL certificate validating, the culprit is generally the fact that your click tracking domain already has SSL set up and there are restrictions that prevent a 3rd party from submitting a Certificate Signing Request on your behalf.
AASA File is Invalid
Luckily the easiest issue to fix as the main reason for this error is the fact that it depends on the SSL being set up correctly. By addressing the SSL error, the AASA file error should resolve itself simultaneously.
6. Test the Integration
Once the validation process is complete, you can test the integration by generating a test link. The test link generated by Branch is unique in that it’s already converted to a Branch link for you and allows you to test without creating an email template in your ESP. In reality, this conversion happens behind the scenes once a user clicks on your normal email template link.
To generate a test link:
- In the Validate & Test section, input a URL from your website.
- Click Get Test Link.
- Once the Test Link is generated, you can share it via:
- Copy to clipboard
- SMS
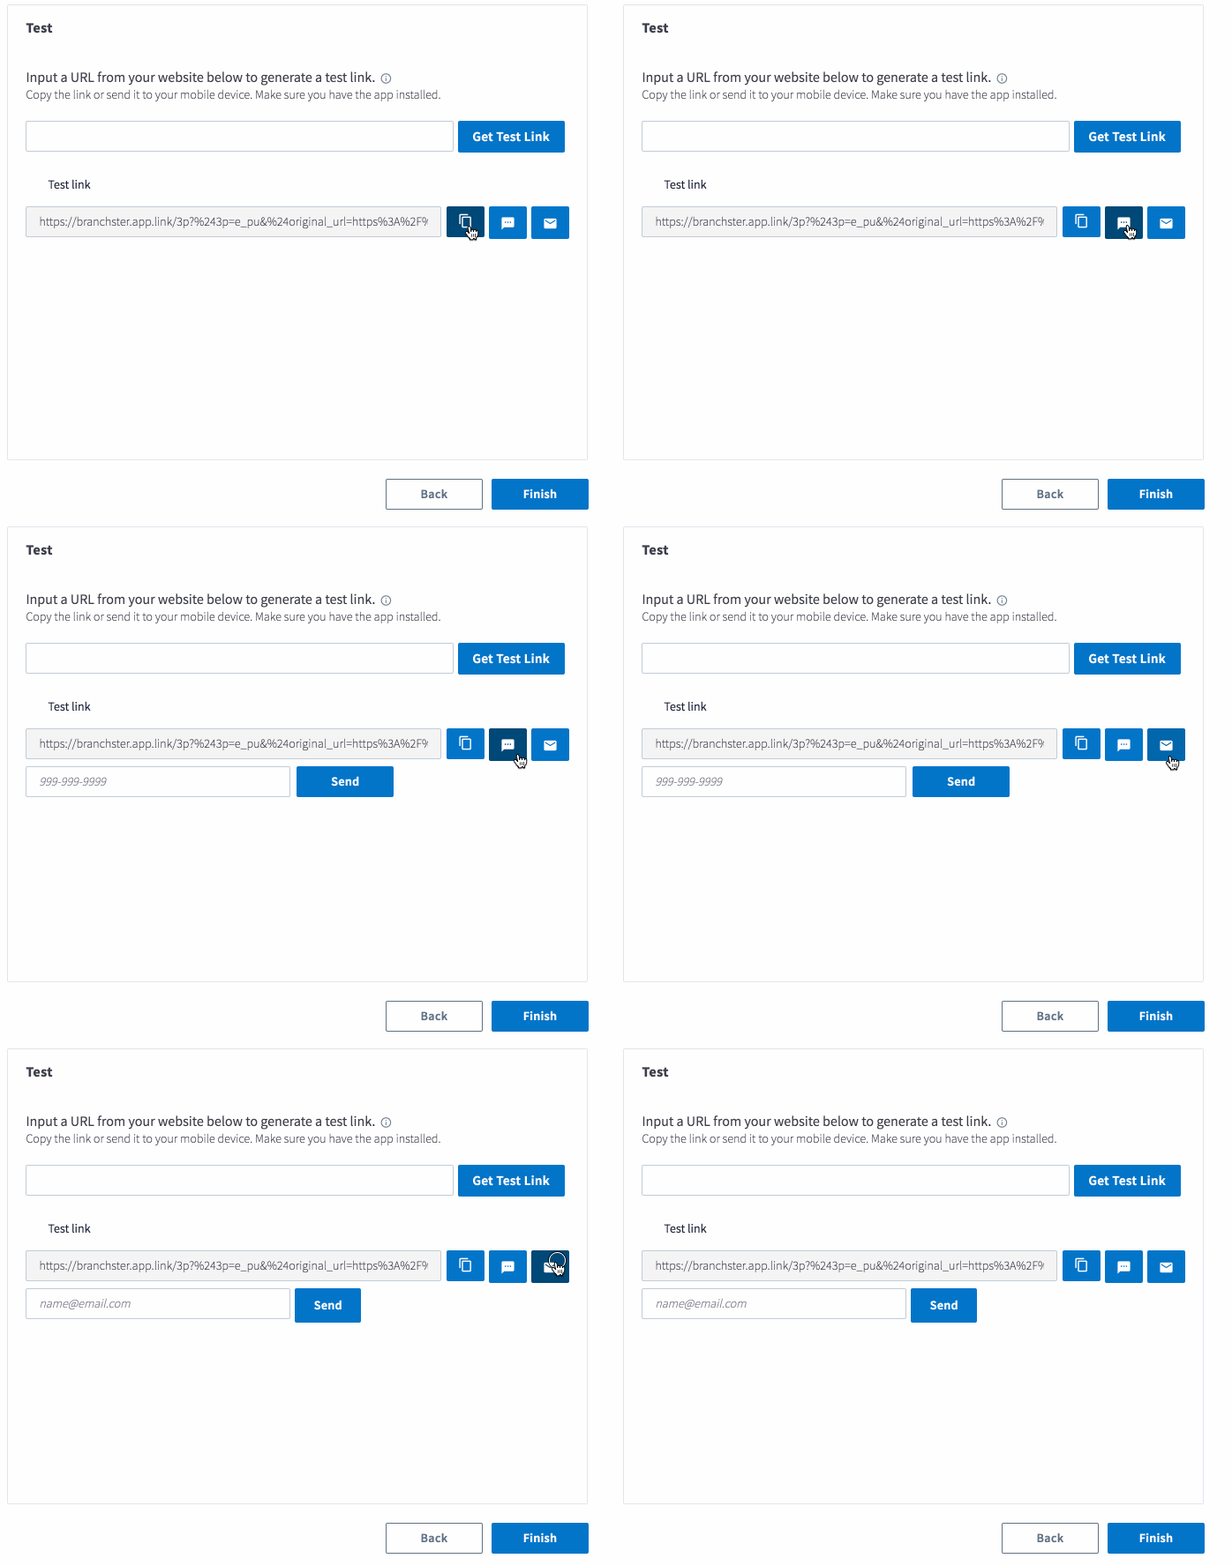
Once you’ve generated your test link, click the link on your mobile device; don’t forget to make sure your mobile device already has the app installed!
7. Start Sending Emails with Flagged Links
Congratulations, you’ve successfully set up the integration with your ESP! Before you start setting up your email campaigns, you need to determine what flow you want the user to experience and flag your email link accordingly.
Most ESPs support the following user flows:
-
Deep linking users to in-app content
- Added to your links as a URL query parameter:
<a href="links.example.com?$deep_link=true" >Link to your app!</a> - Added to the HTML:
<a href="http://example.com" deeplink="true">Link to your app!</a>
- Added to your links as a URL query parameter:
-
Linking users to web-only content
- Added to your links as a URL query parameter:
<a href="links.example.com?$web_only=true" >Link to your app!</a>
- Added to your links as a URL query parameter:
| ESP Name | ESP Required Link Flags |
|---|---|
 |
|
 |
See Dedicated Adobe Campaign Classic Guide |
 |
See Dedicated Adobe Campaign Standard Guide |
 |
|
 |
|
 |
|
 |
|
 |
|
 |
|
 |
|
 |
|
 |
|
 |
|
 |
|
 |
See Dedicated Clevertap + Amazon SES Guide |
 |
See Dedicated Clevertap + Mailgun Guide |
 |
See Dedicated Clevertap + Mandrill Guide |
 |
See Dedicated Clevertap + Sendgrid Guide |
 |
|
 |
|
 |
|
 |
|
 |
|
 |
|
 |
|
 |
|
 |
|
 |
|
 |
|
 |
|
 |
|
|
|
 |
|
 |
|
|
|
 |
|
 |
|
 |
|
 |
|
 |
|
 |
|
 |
See Dedicated Oracle Responsys Guide |
 |
|
 |
|
 |
|
 |
|
 |
|
 |
See Dedicated Salesforce Open Web Default Guide |
 |
See Dedicated Salesforce Open App Default Guide |
 |
See Dedicated Salesforce Legacy v2 Guide |
 |
See Dedicated Salesforce Legacy v3 Guide |
 |
|
 |
|
 |
|
 |
|
 |
|
 |
|
 |
|
 |
|
 |
|
 |
|
Updated 9 months ago


